From AI Blueprint Project ZIP to Code
Understand every Project ZIP file, then move from extraction and a Git baseline to staged, verified implementation with a coding agent.
Table of contents
An AI Blueprint Project ZIP is a handoff package for implementation with a coding agent. Its exact files vary by project and generator version. Treat the manifest, implementation guide, and files actually present as the source of truth.
Project ZIP becomes available only after a full Blueprint is reviewed and receives final approval. The ordinary free preview stops at App Map in read-only mode and provides neither the AI Assistant nor downloads. Read Free Tier, AI Assistant Revisions, and Project ZIP before starting this implementation tutorial.
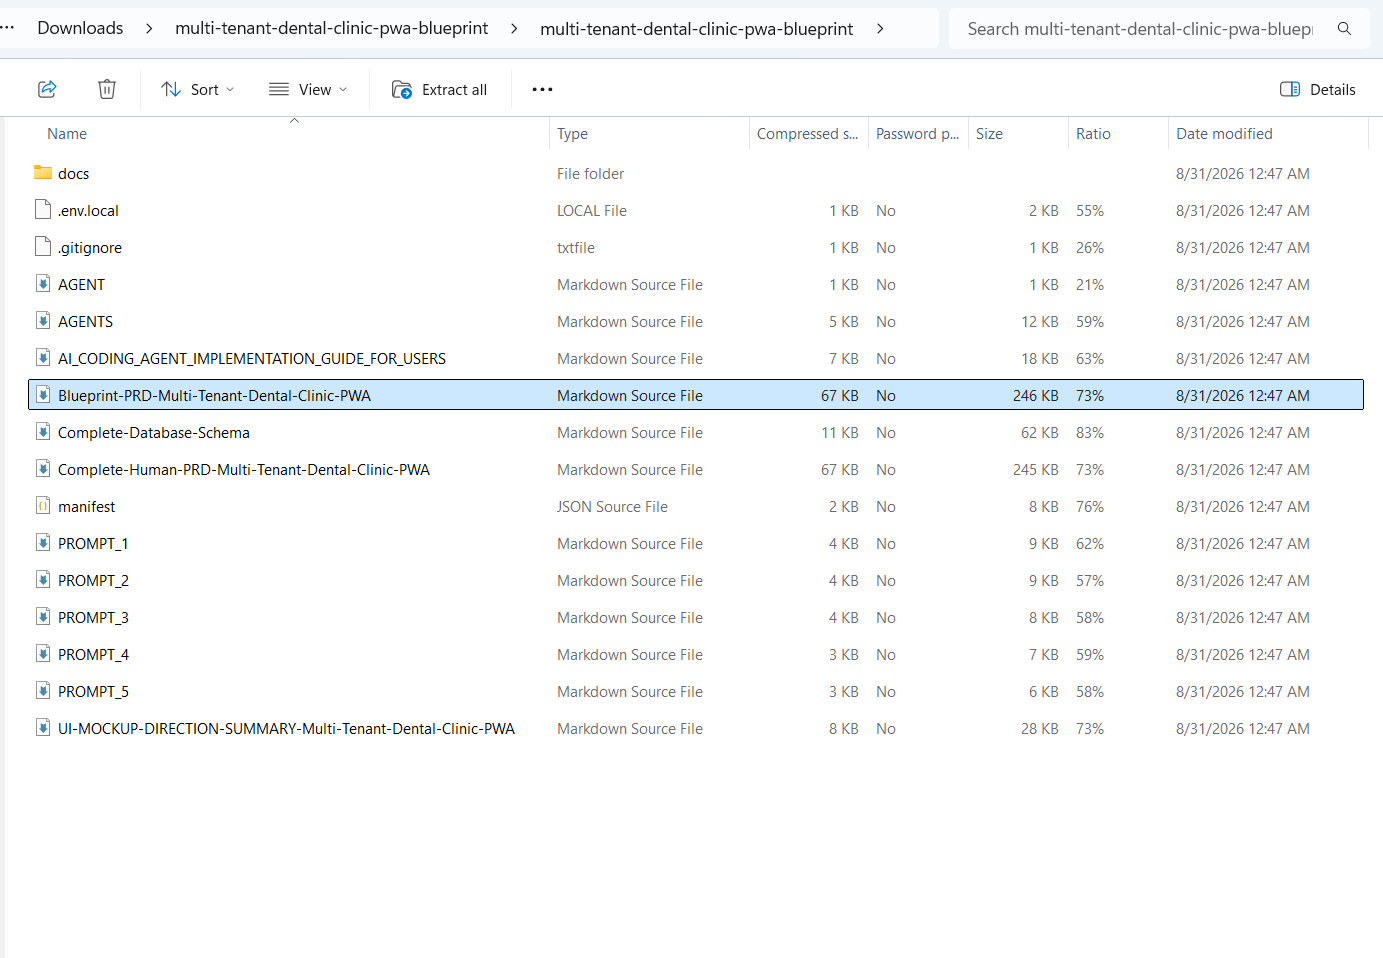
A package can contain:
docs/
.env.local
.gitignore
AGENT.md
AGENTS.md
AI_CODING_AGENT_IMPLEMENTATION_GUIDE_FOR_USERS.md
Blueprint-PRD-<Project>.md
Complete-Database-Schema.md
Complete-Human-PRD-<Project>.md
manifest.json
PROMPT_1.md
PROMPT_2.md
PROMPT_3.md
PROMPT_4.md
PROMPT_5.md
UI-MOCKUP-DIRECTION-SUMMARY-<Project>.md
Names and counts can vary. Project-specific filenames follow the Blueprint title. Use manifest.json as the index instead of guessing a file's role.
Project ZIP File Map
Control and workflow files
| File | Function | Read it | Do not |
|---|---|---|---|
manifest.json | Machine index for package versions, artifact list, document order, hashes, and prompt workflow | First | Edit it to hide a missing or changed file |
AI_CODING_AGENT_IMPLEMENTATION_GUIDE_FOR_USERS.md or its Indonesian equivalent | Operator manual for runtime, SDK, setup, prompts, checkpoints, verification, and recovery | After the manifest | Skip its quality gates or paste every prompt at once |
AGENTS.md | Repository contract for sources of truth, edit rules, security, and tests | Before an agent edits | Remove rules because they seem strict |
AGENT.md | Compatibility file or pointer for tools that look for the singular name | With AGENTS.md | Assume every tool discovers it automatically |
.gitignore | Keeps secrets, dependencies, build output, and local files out of Git | Before the first commit | Remove .env.local from ignored files |
.env.local | Safe local environment template derived from Blueprint needs | Before running the app | Commit real values or use production credentials locally |
Requirements and decision files
| File | Function | How to use it |
|---|---|---|
Blueprint-PRD-<Project>.md | Complete implementation PRD assembled in pipeline order | Primary source for scope, requirements, acceptance criteria, and traceability |
Complete-Human-PRD-<Project>.md | Human-readable review version with an App Map tree | Understand and approve the product; surface any conflict with the implementation PRD |
Complete-Database-Schema.md | Complete data contract for tables, fields, keys, constraints, indexes, and relationships | Authority for persistence and migrations; never invent a schema from the UI |
UI-MOCKUP-DIRECTION-SUMMARY-<Project>.md | Mini product brief and art direction for mockup generation | Use for visual exploration; it is not a complete PRD |
docs/ | Per-stage files such as Idea Review, Journey, Technical Foundation, Schema, App Map, Security, MVP, and UI/UX | Read a focused domain without repeatedly loading the entire PRD |
docs/implementation-sources/, when present | Intermediate decisions and stable traceability IDs | Use for audit, diagnosis, and cross-artifact consistency |
The five implementation prompts
| Prompt | Purpose | Usage | Review evidence |
|---|---|---|---|
PROMPT_1.md | Read the Blueprint carefully, explain the project, find conflicts, and prepare the foundation | Once, before substantial coding | Project understanding, requirement inventory, plan, setup, and risks |
PROMPT_2.md | Build a complete usable prototype with the main flow and simple CRUD using dummy data | Once after Prompt 1 approval | Important screens, navigation, states, forms, validation, and core interactions work |
PROMPT_3.md | Turn one vertical slice into production implementation | Repeat for one task or slice at a time | Database, authorization, errors, tests, UI states, and slice acceptance criteria pass |
PROMPT_4.md | Coordinate agents on truly independent work | Optional after a stable baseline | File ownership, merge order, per-agent tests, and integration evidence |
PROMPT_5.md | Resume interrupted work without repeating or damaging progress | After a limit, crash, or agent handoff | Reconciled state, done/pending work, current checks, and exact next action |
PROMPT_3.md is not a "finish everything" command. Run it for one vertical slice, verify and commit, then repeat for the next slice.
Source-of-Truth Precedence
Use this decision order:
manifest.jsondefines what belongs to the package and its artifact versions.- The Blueprint PRD defines approved implementation scope and requirements.
Complete-Database-Schema.mddefines persistence and migrations.- Individual
docs/files provide domain detail and traceability. - The Human PRD supports review but must not silently change requirements.
- UI Mockup Direction controls art direction, not business rules.
- The guide and prompts define the workflow, not new product features.
If two authoritative files genuinely conflict, the agent must stop, show short excerpts with filenames, explain the implementation impact, and request a decision.
Step 0: Extract the ZIP
Do not code inside the compressed archive. Extract it into a normal project folder, then open that folder in your IDE. Git, build tools, and coding agents need a real filesystem where changes can be diffed and committed.
Step 1: Protect Secrets
Inspect .env.local before Git or agent access. Remove production values that are not necessary, add environment files to .gitignore, and create .env.example with empty values when useful. Never paste secrets into chat, issues, screenshots, logs, or viewers.
.env
.env.local
.env.*.local
Step 2: Create a Git Baseline
If the folder is not already a repository:
git init
git add .
git commit -m "chore: import AI Blueprint handoff"
If it is already a repository, inspect git status and make a checkpoint commit. Do not reinitialize an existing repository.
Step 3: Read Sources of Truth
Read the manifest, implementation guide, repository instructions, PRD, database schema, docs, and staged prompts in the order specified by the package. Do not assume AGENT.md and AGENTS.md have identical auto-discovery behavior across tools.
Open .md files in FileMira Markdown Viewer when you want source and rendered views side by side. Inspect .json in the JSON Viewer, .csv in the CSV Editor, YAML in the YAML Viewer, and TOML in the TOML Viewer. FileMira says processing stays in the browser, but secret files still require local private handling.
Step 4: Choose One Agent and IDE
Use one primary coding agent in one working tree. Pair it with VS Code, Google Antigravity IDE, or another editor you can inspect confidently. Parallel agents can wait until you understand Git diff, commits, recovery, file ownership, and worktrees.
Step 5: Run PROMPT_1.md and Require a Full Explanation
Open PROMPT_1.md and use it intact. The first pass through the PRD should establish product meaning. The second pass should inventory requirements, dependencies, permissions, data, and acceptance criteria. Do not allow substantial edits until the agent explains the project back to you.
Read the manifest, implementation guide, PRD, schema, docs,
and repository instructions. Follow PROMPT_1.md as the primary workflow.
Read the PRD once for product meaning, then a second time for
requirements, dependencies, permissions, and acceptance criteria.
Do not edit files.
Create PLAN.md with sources of truth, conflicts, implementation stages,
target areas, dependencies, security boundaries, acceptance criteria,
verification commands, and missing information.
Finish by explaining the entire project: goals, actors, workflows,
features, data, permissions, integrations, UI direction, non-goals,
risks, and definition of done.
Do not invent new product requirements.
Compare the agent's feature inventory with the PRD. Do not move to the prototype while a requirement is missing. Resolve document conflicts before coding. A later approved decision overrides an older draft only when its authority is clear.
Step 6: Scaffold from the Technical Foundation
If the ZIP contains documentation but no source code, create the project skeleton using the defined framework, runtime, database, auth, and package manager. Do not replace the stack because an agent prefers another tool. Run the initial project and commit the clean scaffold.
Step 7: Pass the Design Gate
Before generating many screens, collect two or three legal references, choose a direction, write DESIGN.md, and create ASSETS.md. Implement one vertical slice first. AI coding speeds up implementation but does not replace art direction, brand assets, accessibility, or human visual review.
Step 8: Run Staged Prompts One at a Time
If the ZIP contains PROMPT_1.md through PROMPT_N.md, do not paste them all into one session. Follow the manifest and repeat:
READ STAGE
-> PLAN
-> IMPLEMENT
-> LINT / TYPECHECK / TEST / BUILD
-> SCREENSHOT OR FUNCTIONAL VERIFICATION
-> REVIEW DIFF
-> HUMAN REVIEW
-> COMMIT
-> NEXT STAGE
Stop after each stage until its acceptance criteria pass.
Prompt 2: a prototype people can actually try
A prototype is not a set of static screens. It should include:
- every important route and navigation path;
- one completable end-to-end user flow;
- simple create, read, update, and delete behavior with dummy data;
- working forms, validation, and feedback;
- loading, empty, error, success, disabled, and responsive states;
- no unexplained fake buttons;
- a clear boundary between dummy data and production contracts.
Prompt 3: production work by vertical slice
Choose one user outcome, not one technical layer. A "create appointment" slice can include UI, validation, API, authorization, database, audit, tests, and error states needed to complete that outcome.
Use this wrapper when running a stage:
Implement only the current prompt target according to the manifest and implementation guide.

Before editing:
- summarize the scope;
- list target files;
- state acceptance criteria;
- state risks.

Rules:
- do not expand scope;
- do not replace stack, schema, or package manager without a documented reason and approval;
- follow DESIGN.md for UI;
- never use production secrets.

After editing:
- run relevant checks;
- inspect the Git diff;
- report changed files, tests, and remaining risks.

Do not continue to the next vertical slice until this one is reviewed and committed.
Step 9: Verify Engineering, UI, and Data
Use the commands defined by the repository. Inspect git status and git diff. For UI, test desktop, mobile, loading, empty, error, validation, long content, keyboard focus, and basic accessibility. For database and auth, inspect migrations, server-side authorization, user isolation, client secret exposure, and destructive operations.
Step 10: Commit Small Milestones
Small commits make rollback, review, handoffs, and conflict resolution easier. If a usage window ends, commit only valid finished work and write HANDOFF.md with completed work, pending work, failing checks, touched files, and the exact next step. Do not restart the project.
Step 11: Use Worktrees Only When Needed
After the baseline is stable, separate truly independent tasks with one agent and one branch per worktree. Assign file ownership, merge one branch at a time, update the remaining branch, and rerun integration tests.
Step 12: Final Acceptance
- In-scope PRD acceptance criteria are verified.
- No hidden scope expansion occurred.
- Relevant lint, typecheck, tests, and build pass.
- Auth, authorization, migrations, and data isolation were reviewed.
- Environment files and secrets are safe.
- UI states, responsiveness, and accessibility basics are complete.
- Asset placeholders are identified.
- The final diff and preview deployment were reviewed.
Official sources and references
Use these sources to confirm current commands, capabilities, prices, and limits.
Was this guide helpful?
Tell us whether the steps worked or if something needs an update.